


How to Refinish Wood Trim on Classic and Vintage Cars
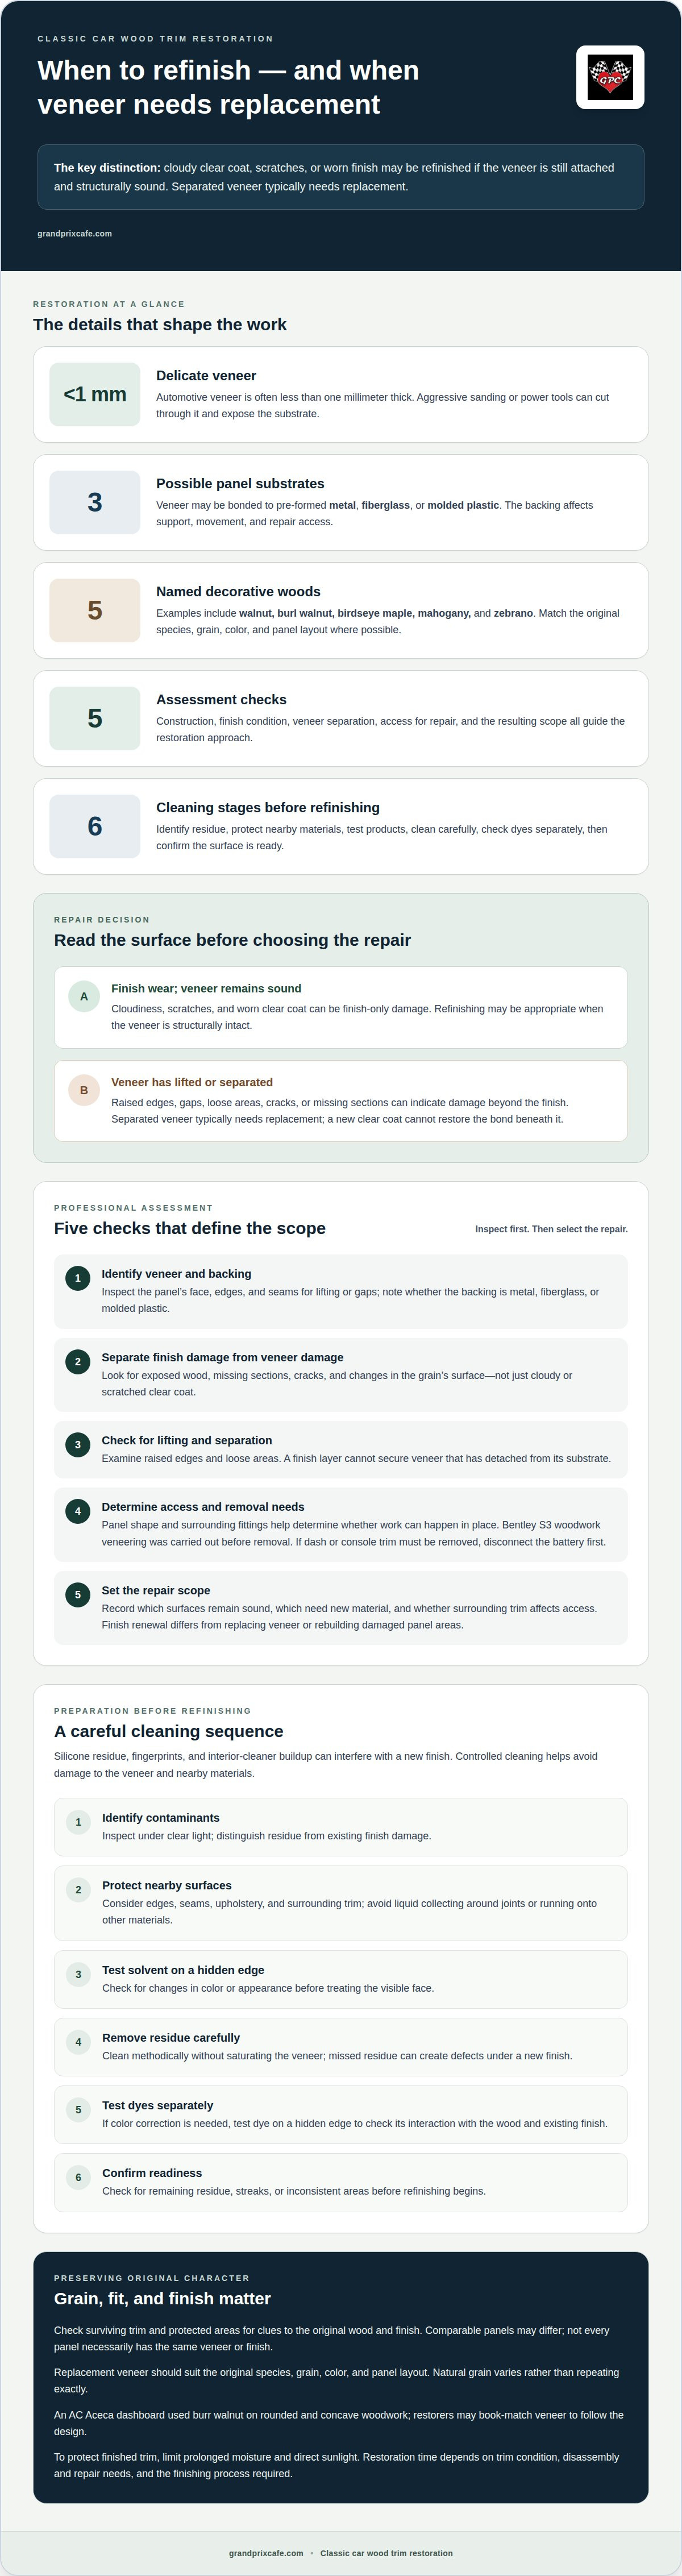
A worn finish doesn’t always mean the wood is damaged. For wood trim restoration for classic cars in Sag Harbor, finish-only wear can often be addressed when the veneer is still attached and structurally sound. Veneer that has separated from its backing may need replacement. This distinction shapes the restoration approach.
Owners often want to preserve a classic car’s original interior character while addressing cloudy clear coat, scratches, or lifting veneer. A professional assessment identifies the damage, prepares sound surfaces for refinishing, and determines when re-veneering is more appropriate.
Careful cleaning, the condition of the existing finish, and differences between panels all affect the restoration. Understanding these details helps guide decisions that respect the car’s materials instead of treating every worn surface as the same repair.
Table of Contents
Professional assessment of veneer damage and repairability
Classic car wood trim can sometimes be restored in place; access and damage determine whether removal is necessary. For example, Bentley S3 woodwork veneering was carried out before removal. A professional assesses the panel’s construction and condition before selecting an approach.
Identify the veneer and its substrate. Automotive veneer is bonded to pre-formed metal, fiberglass, or molded plastic panels. The underlying material affects how a specialist evaluates movement, support, and repair access. Inspection includes the panel’s edges, seams, and visible face, where lifting or gaps can indicate separation from the backing.
Separate finish damage from veneer damage. Cloudiness, scratches, and worn clear coat may affect only the finish. Refinishing remains an option when the veneer itself is structurally intact. A specialist looks for exposed wood, missing sections, cracks, and changes in the grain’s surface before deciding how much material needs attention.
Check for lifting and separation. Veneer that has detached from its substrate typically requires replacement with new material. A professional examines raised edges and loose areas rather than treating a loose surface as finish-only wear. This distinction matters because a new clear coat cannot restore a secure bond beneath the veneer.
Assess removal and repair access. The panel’s shape and surrounding fittings help determine whether restoration can proceed in place. Some work may be possible before removal, as the Bentley S3 example shows. If dash or console trim must be removed, the battery should be disconnected first to reduce electrical risk during disassembly.
Set the repair scope from the findings. A finish-only repair differs from replacing separated veneer or rebuilding damaged panel areas. The assessment records which surfaces remain sound, which sections need new material, and whether surrounding trim affects access. That scope gives the restoration a clear basis before refinishing begins.
How professionals clean veneer before refinishing
Identify contaminants before choosing a cleaner. Silicone residue, fingerprints, and interior-cleaner buildup can interfere with refinishing. A professional examines the surface under clear light and notes cloudy or uneven areas. That inspection helps distinguish residue from existing finish damage and informs the cleaning sequence.
Protect adjacent materials and fittings. Before cleaning a wood panel, the specialist considers its edges, seams, and nearby upholstery or trim. A controlled application keeps liquid from collecting around joints or running onto other interior surfaces. For an installed panel, access and surrounding materials guide how carefully the work proceeds.
Test solvents on a hidden edge. Solvents can affect existing finishes, dyes, or exposed veneer differently. A professional tests the selected cleaner on an inconspicuous edge before treating a visible face. The test area reveals whether the surface changes in color or appearance, helping prevent an unsuitable product from marking prominent woodwork.
Remove residue with controlled cleaning. The cleaning process targets silicone, fingerprints, and cleaner buildup without saturating the veneer. A specialist works methodically across the panel, giving particular attention to handling marks and edges. Even coverage matters: missed residue can create defects when a new finish is applied.
Evaluate dyes separately from cleaners. If color correction is part of the restoration, the professional tests the dye on a hidden edge before broader use. This shows how the chosen color interacts with the existing wood and finish. A small test also helps preserve visible grain rather than masking its natural variation.
Confirm the surface is ready for finishing. After cleaning, the specialist checks for remaining residue, streaks, or areas that look inconsistent. The panel should be clean before the refinishing stage begins. For guidance on professional car restoration, consider the full condition of the trim and its surrounding interior.
Classic and vintage car wood restoration
Restoration preserves more than a glossy surface: wood species, grain, fit, and finish all contribute to a cabin’s character. Careful assessment of these details helps guide the work.
Identify Original Woods and FinishesBegin by identifying the wood species and looking for clues to the original finish on surviving trim. Decorative veneers can include walnut, burl walnut, birdseye maple, mahogany, and zebrano. Check protected areas and comparable panels, since finishes may vary and not every panel necessarily has the same veneer or finish.
Match Wood and FinishesReplacement veneer should suit the original species, grain, color, and panel layout. Natural grain varies rather than repeating exactly. For example, an AC Aceca dashboard used burr walnut on rounded and concave woodwork, and restorers may book-match veneer to follow the design. To protect finished trim, limit prolonged moisture and direct sunlight, which can affect the wood and finish.
Understand the risks of DIY wood trim restoration on a classic carAssess the risks before attempting restoration. Automotive veneer is often less than one millimeter thick, so aggressive sanding or power tools can remove its surface and expose the substrate. Plastic trim tools help protect edges during removal. Professional restoration manages delicate veneer, curved panels, and finish application with methods suited to the material.
Estimate Professional Restoration TimeEstimate the work from its scope, not from a fixed timetable. A panel needing finish renewal differs from trim requiring removal, substrate repair, or re-veneering. The number and shape of pieces also affect the sequence. A Mercedes Pullman six-door limousine project involved 60 pieces, illustrating how extensive trim sets require broader coordination. Curing and finish stages also influence scheduling.
Genuine automotive veneer consists of a thin slice of hardwood bonded to a rigid structural substrate. Use plastic trim tools to avoid damaging trim edges. Begin clear-coat removal with 600-800 grit wet paper on a soft backing pad, and use alcohol-based dyes for color restoration whenever possible. On an AC Aceca dashboard re-veneering project, the restorer may book-match the veneer according to the client’s ideas and requirements. These choices keep the work focused on the veneer’s construction and the client’s requested appearance.
How long does professional wood trim restoration take for a classic car?
Define the restoration scope. A professional first separates finish renewal from veneer replacement, then records the panels involved. One dashboard with worn clear coat requires a different sequence from a full cabin set. The assessment also identifies damaged edges, missing veneer, and panel areas needing substrate repair. These findings establish the work stages, not an unsupported fixed completion date.
Account for removal and access. Trim that can be restored in place avoids some disassembly steps. Dashboards, consoles, and surrounding fittings can add careful removal and refitting work. Panel shape matters, too: a curved or concave piece takes different handling from a flat insert. The professional maps these access requirements before scheduling the restoration.
Include veneer repair and matching. Separated veneer typically requires replacement, while finish-only wear may need less material work. Matching walnut, mahogany, or birdseye maple involves attention to grain and color. A multi-piece interior adds coordination because adjoining sections should read consistently. The scope expands when replacement material must follow complex curves or a specific grain layout.
Allow for each finishing stage. Clear-coat removal, color restoration, and application of new finish occur in sequence. Multiple ultra-thin coats of automotive-grade 2K urethane clear finish require time between application and later handling. Wet sanding cured clear coat is a separate finishing stage. Rushing these stages risks marks or an uneven appearance, so the process follows the material’s readiness.
Plan around the complete set. A Mercedes Pullman six-door limousine re-veneering project involved 60 pieces, illustrating the coordination a large interior can require. Confirm which trim pieces are included and whether repair, re-veneering, or refinishing is needed. Clear scope makes scheduling more useful than a broad estimate. Discuss professional restoration planning for your classic car’s wood trim.
Grand Prix Cafe: Classic Car Sales
Grand Prix Cafe provides classic car sales and car restoration for owners assessing a vintage vehicle’s condition and preservation needs. If the wood trim requires more than finish renewal, it can be considered as part of the car’s broader restoration. The appropriate scope depends on the veneer, its substrate, and the surrounding interior.
Grand Prix Cafe also provides car service and vehicle consignment. These services support different ownership needs, from maintaining a classic car to considering a sale. For a restoration discussion, share the vehicle’s make and model, the affected trim pieces, and any known repair history. These details help frame the work around the car’s materials and condition.
Contact Grand Prix Cafe to discuss your classic car.
Plan the Next Chapter for Your Classic
Choose a restoration approach that supports the car’s longer-term role. You may be preserving it for continued ownership, preparing it for a future sale, or coordinating trim work with broader maintenance. A clear priority keeps decisions about materials and finish connected to the vehicle as a whole. For wood trim restoration for classic cars in Sag Harbor, consider how the interior should serve the car’s next chapter, not only improve its appearance now.
Grand Prix Cafe offers car service, classic car sales, and vehicle consignment services, alongside car restoration. These options can support owners with different priorities, from maintaining a vehicle to preparing for a change in ownership. Share what you’re aiming to accomplish and discuss an appropriate next step. Contact Grand Prix Cafe about your wood trim, and move forward with care for the car’s character.
Frequently Asked Questions
What types of wood trim restoration services are available for classic cars on Long Island?
For wood trim restoration for classic cars in Sag Harbor, Grand Prix Cafe provides Car Restoration and Car Service. Woodwork can be considered alongside the vehicle’s broader restoration needs. The scope depends on the trim’s condition and the car’s overall requirements. Describe the affected panels, previous repairs, and preservation priorities to help frame the work.
What are the steps involved in restoring, refinishing, or replacing classic car wood trim?
A professional restoration typically begins by recording the trim’s condition and defining the work, then proceeds through preparation, repair or replacement, and refinishing. Keep removed pieces identified by their original positions, especially when panels differ in shape or grain. For wood trim restoration for classic cars in Sag Harbor, documenting each piece can help maintain its intended fit and appearance during reassembly.
How can I tell whether classic car wood trim can be repaired or needs replacement?
Trim may be repairable when damage is limited to the finish and the veneer remains sound. Replacement may be needed if the veneer has separated from its backing. Look for lifting edges, missing wood, and differences across adjoining panels. A loose section beside an intact panel requires a different scope from uniform finish wear. A professional assessment can establish the extent of the damage.
Comments